
MEASURE GUIDE
Introduction to measurements
Measuring for sails can seem daunting at first glance. We can reassure you that it is quite simple and typically takes 10-15 minutes. Our system is so efficient that errors are very rare.
Your measures undergo a series of checks against our databases and the images you may have submitted, as well as old measurement certificates. When everything looks right, our sail designer approves. Then we are ready to produce your sail. We take a great deal of responsibility for your measures.
Selection of measuring tape
We want to have as accurate measurements as possible. Therefore, it is a good idea to buy a full-length tape measure.
Note that on some measuring tape starts 0 cm from the end therefore note where the 0 point is on your measuring tape.
PLEASE NOTE
This is our general measurement guide. Don't take all these measures. We will send you a customized measurement guide when you have an order with us.
MAINSAIL
Introduction to mainsail
It may seem logical to measure the old sail. However, it is in practice easier and far more accurate to measure directly on the mast / boom. If we make your main sail from the old sail, you get a sail like your old one. Your old sail may not necessarily fit your rig. Measuring mast / boom takes less time than measuring old sail. The mast / boom can be measured lying down or mounted on the boat.
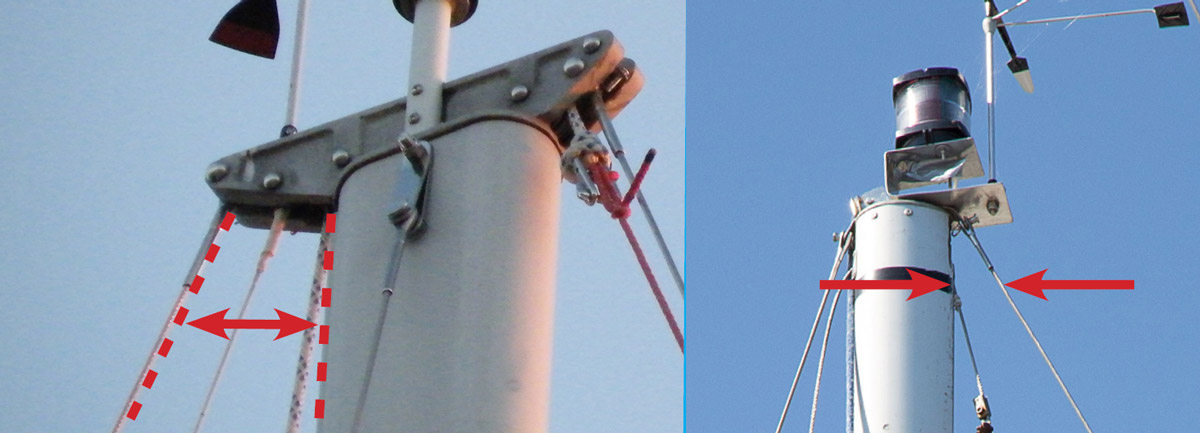
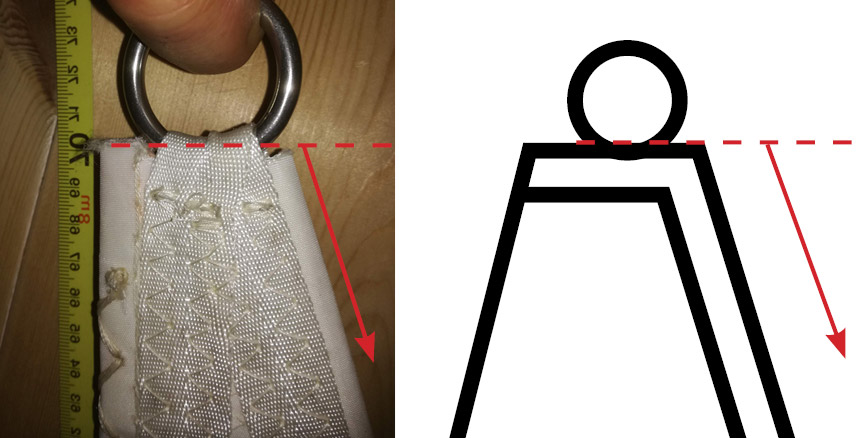
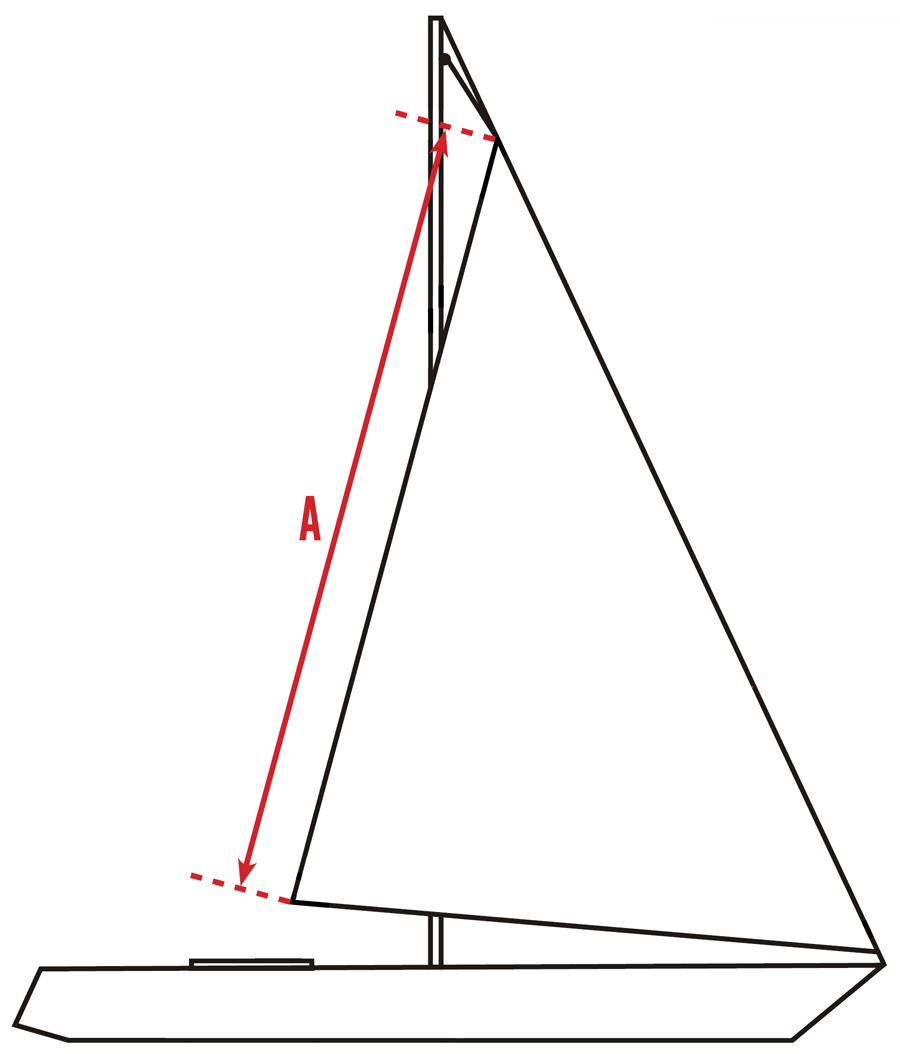
P - Luff measured on mast
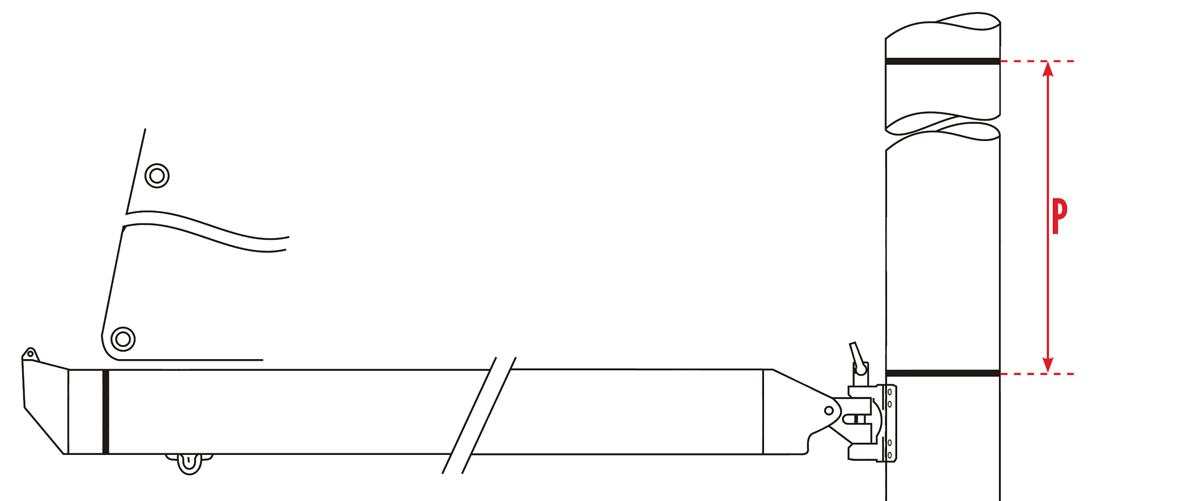
The luff is the front edge of the sail that sits against the mast.
Pull a tape measure into the mainsail halyard/rope. Measure down to the top of the boom as close to the mast as possible. If necessary, extend the upper edge of the boom to the mast with a sail batten or similar.
We never use measures from "eye to eye" so it is important that you measure as we ask.
Choose one of the measurement methods below:
A. Max measure on rig
If you pull the measuring tape all the way up the slope so it can't get higher up, this is "Max target on rig". We then deduct approx. 15 cm, and change your dimension to "Dimensions of sail". See below.
B. Measure on sail
If you pull the tape measure up to where the sail is going to end, select "Measure on sail". We make the sail this length.
On many boats there is a black piece of tape around the mast at boom height, as well as black tape around the mast at the top where the sail should go. They indicate where the sail should start and end.
E - Foot measured on boom
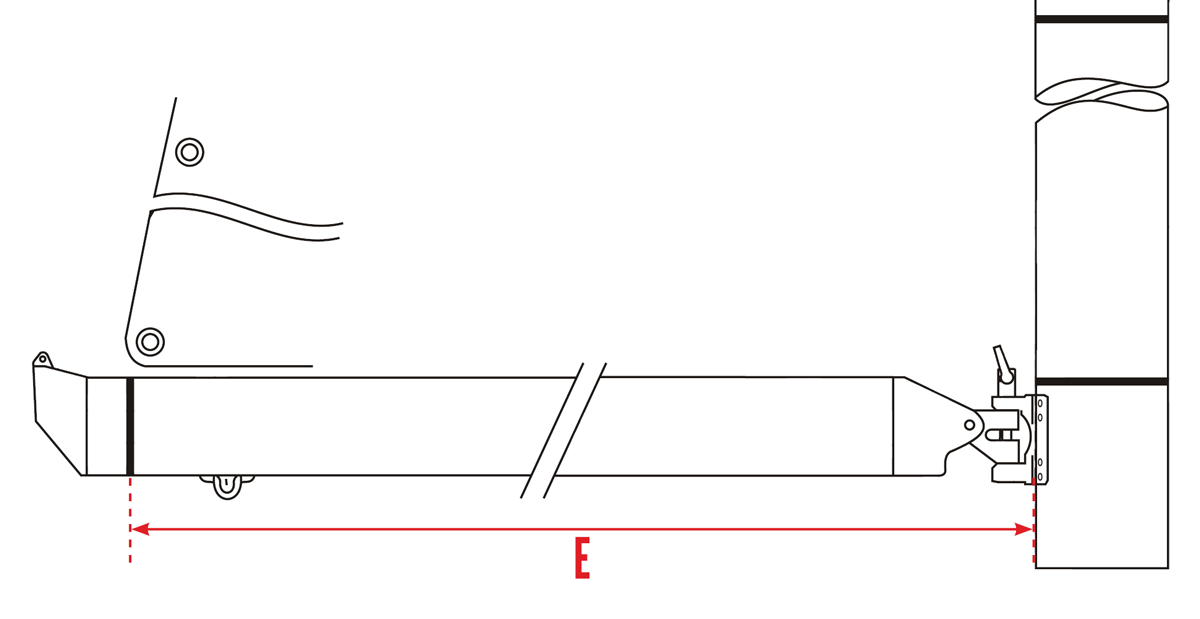
The foot is the bottom edge of the sail that sits down against the boom.
Measure from the edge of the mast to where the rear edge of the sail should stop on the boom. We never use measures from "eye to eye", so it is important that you measure from the mast edge to where the sail should stop. On many boats there is a black piece of tape around the boom, indicating where the sail should stop.
A. Max measure on rig
You can also measure from the edge of the mast right out to the shackle of your boom tail. This is the maximum length the foot can have. We then deduct approx. 5 cm and change your dimension to "Dimensions of sails". See below.
B. Dimensions of sails
Select this if you have measured from the mast's edge to where the sail should stop on the boom. We make the sail this length.
AL - Leech measured on mast
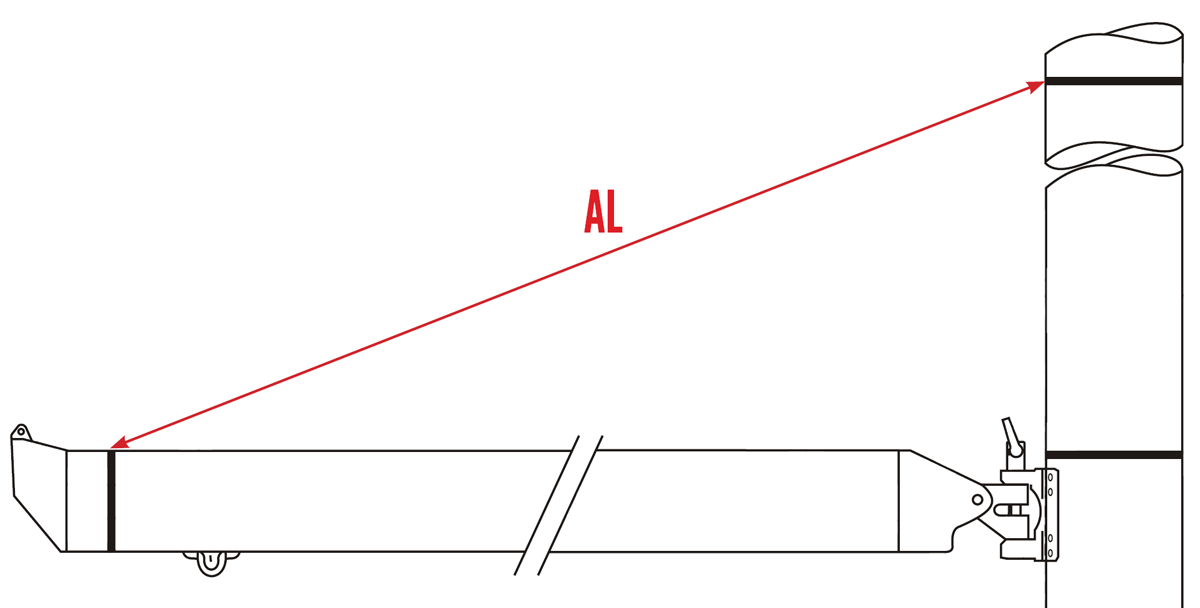
The leech is the rear of the sail, starting from the top of mast to the rear end of the boom.
The leech is measured in the same way as P - Luff. Put the boom in your preferred position with the slope you want. Pull a tape measure up in the mainsail halyard in the mast. Measure down to where the sail should end on the boom. See E - Foot.
Note that the halyard should be held to the mast with a slide, or by pulling the sail up when measuring.
A. Max measure on rig
If you pull the measuring tape all the way up in the halyard so it can't get higher up, this is "Max measure on rig". We then deduct approx. 15 cm, and change your dimension to "Measures of sail". See below.
If you measure "AL - Leech" as "Max measyre on rig", you should also measure "P - Luff" like that.
B. Measures of sails
If you pull the tape measure up to where the sail is going to end, select "Measures on sail". We make the sail this length.
On many boats there is a black piece of tape around the mast at boom height, as well as black tape around the boom where the sail should end. In that case, measure between these two black pieces of tape at the top and bottom.
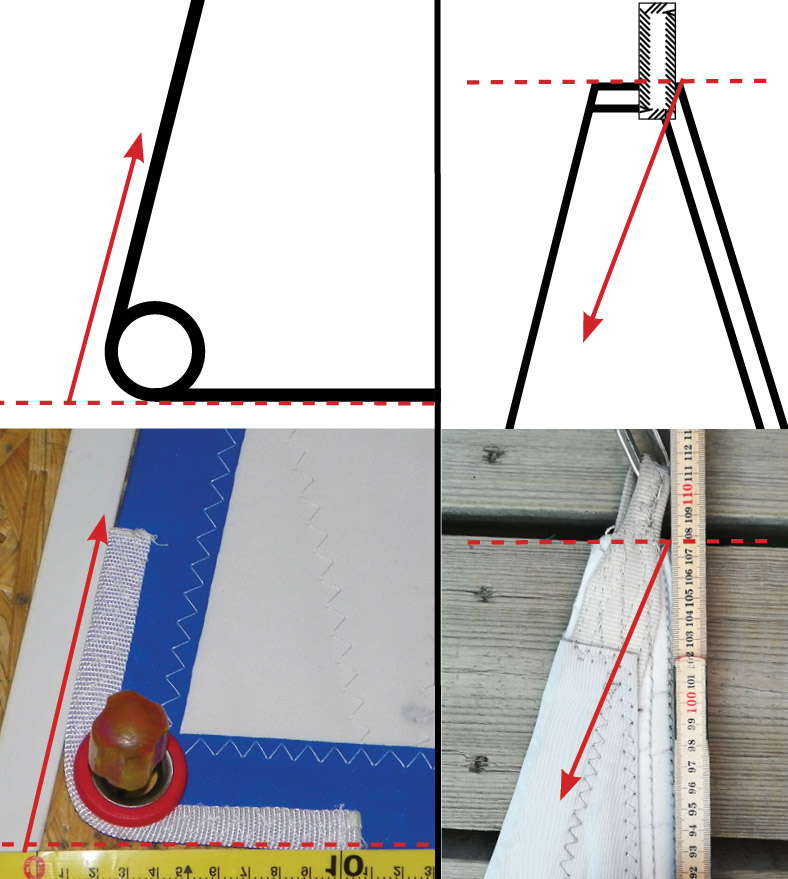
TACK - A
Tack A is the distance from the top of the boom to the mast entry where you insert the slides.
The tack itself is the area where mast and boom meet.
Tack A is measured from the top of the boom right at the mast and up to where you put in your slides into the mast. We use this measure to make sure we don't put a slide in the mast entry
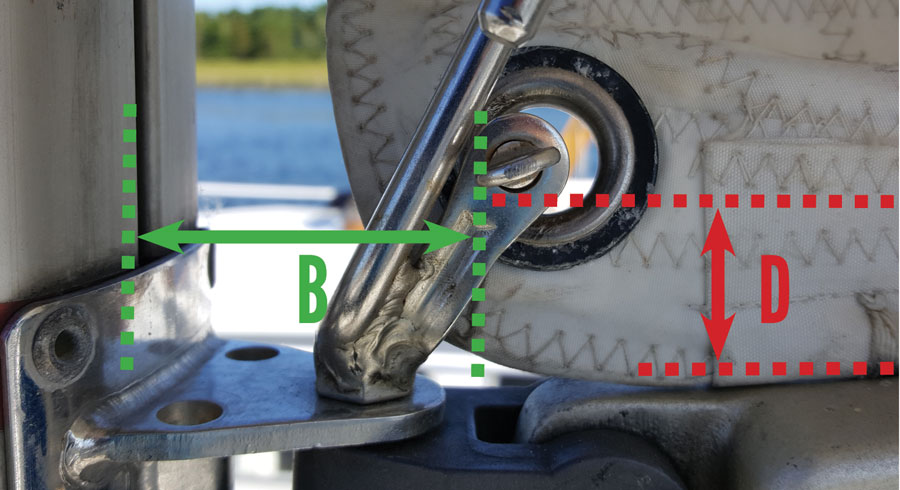
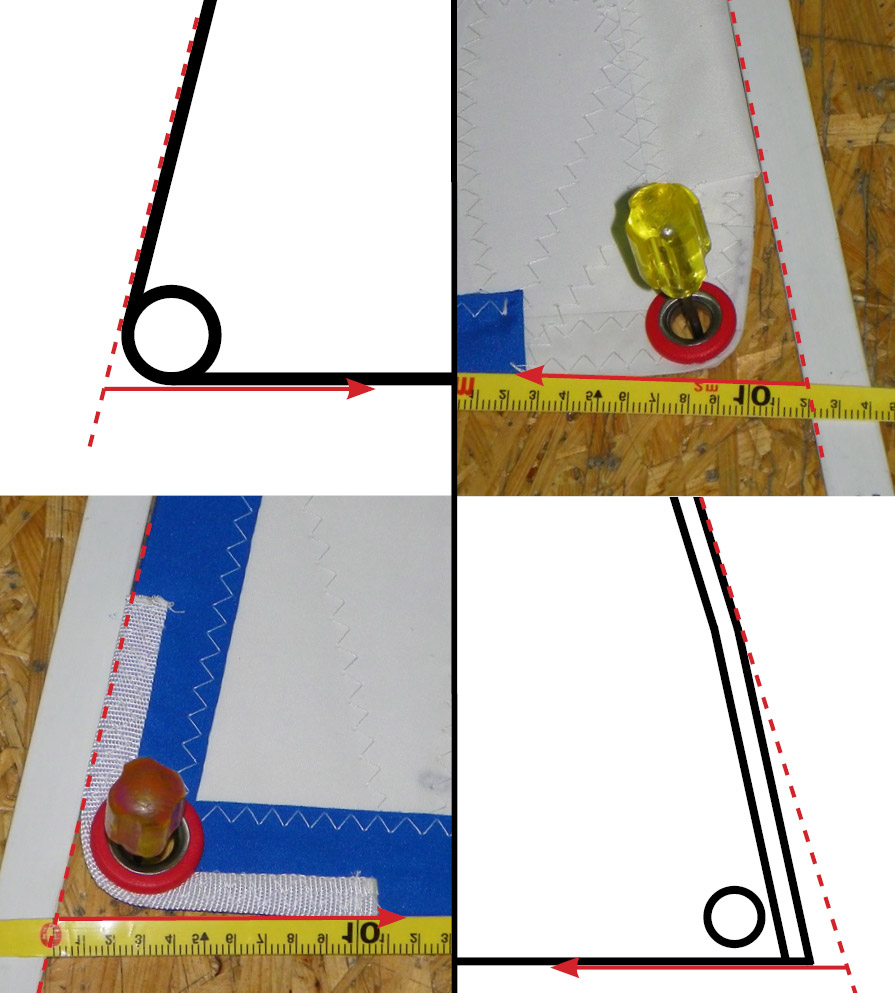
Tack - B/D measured on rig
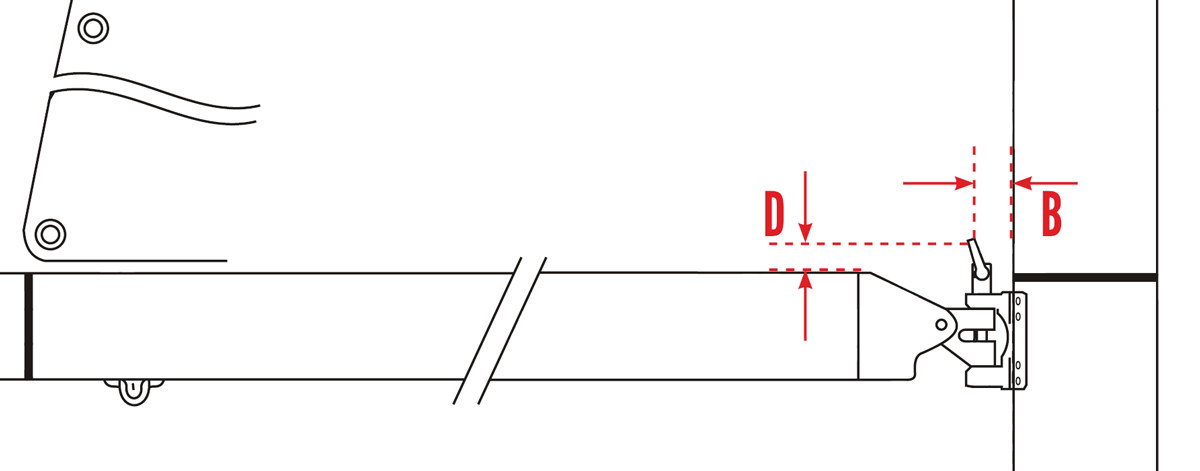
In the corner of the sail that is fixed where the mast and boom meet, we mount an eye.
To find out where the eye should be put in the sail, we need to know where the split/shackle that goes through the sail is located.
Tack - B is the distance from the mast to the shackle/split that goes through the sail.
Tack - D is the distance from the upper edge of the boom to the shackle/split going through the eye of the sail.
The tack itself is the area where mast and boom meet.
Note that the goose neck/hooks are not intended to secure the sail permanently. They are meant to be used when reefing the sail.
There must be an eye, shackle or split. They should preferably sit as close to the mast as possible.
Now you have the opportunity to clean up the shackle-on-shackle, bindings etc. and do it properly and as clean as possible.
Split
If there is a split, measure Tack B from the edge of the mast to the split. Tack D is measured from the upper edge of the boom, extended in to split with e.g. a batten, and to underside of split. We are not going to use measures to the middle of the split. Always to the edge of split.
See Example 1 below.
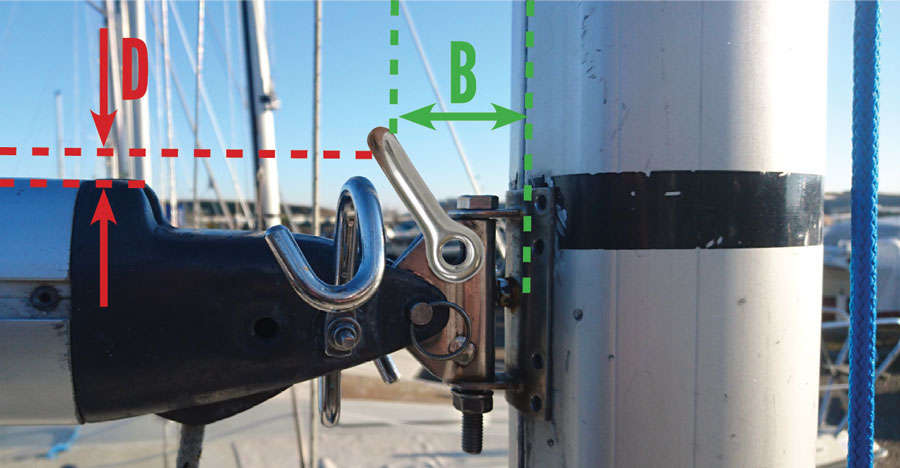
Shackle
If there is a shackle, hold it for approx. 45 degrees, as shown in the drawing above. Measure Tack B from the edge of the mast to the shackle. Measure Tack D from the upper edge of the boom, extended to the shackle with e.g. batten, and to the underside of the shackle. We are not going to use measures to the middle of the shackle. Always to the edge of the shackle.
You can advantageously choose a shackle that is exactly as long as it sits 1-2 cm above the top of the boom when the shackle is at 45 degrees.
See Example 2 and Example 3 below.
Eye/hole
If you only have an eye/hole, find a shackle to put in. See above for shackle selection.
You can choose to tie the sail with a piece of rope. In that case, it is measured as a shackle.
Example 1
The goose neck can just be seen above the shackle/split. It is not intended to permanently secure the sail.
Measure Tack B from the edge of the mast to the split. Measure Tack B from the top of the boom and up to the underside of the shackle/split.
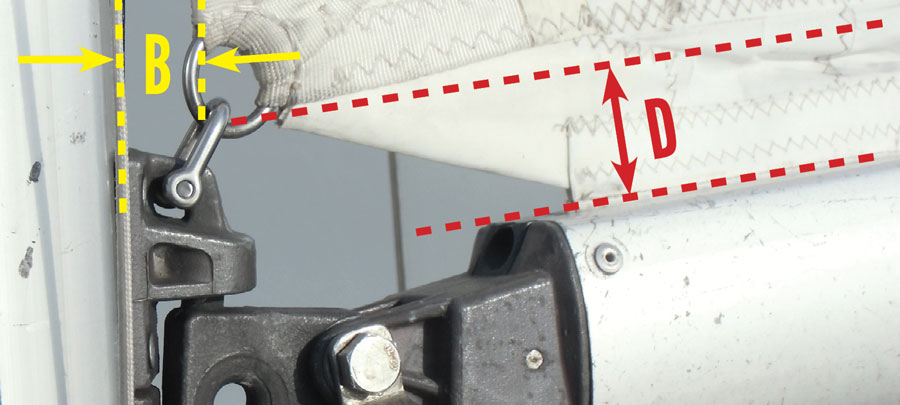
Example 2
Again, the goose neck/hooks can be seen in the picture. These are to reef the sail.
On the left you can see how to measure the Tack D from the upper edge of the boom, which can be extended with a batten.
Example 3
This is what the shackle looks like when the sail is mounted, and it illustrates why the shackle/split must be measured to the edge and not to the middle. Tack B is measured from the edge of the mast to the shackle.
TACK - C
Tack C is the distance from the mast to the reef holes/goose neck in the sail.
Tack C are measured by measuring on either the mast or the sail.
On the mast, measure from the edge of the mast to the goose neck, or the front of reef lines.
On the sail it is measured from the sledge edge, where the mast normally is, and to the leading edge of the reed eye on the inside.
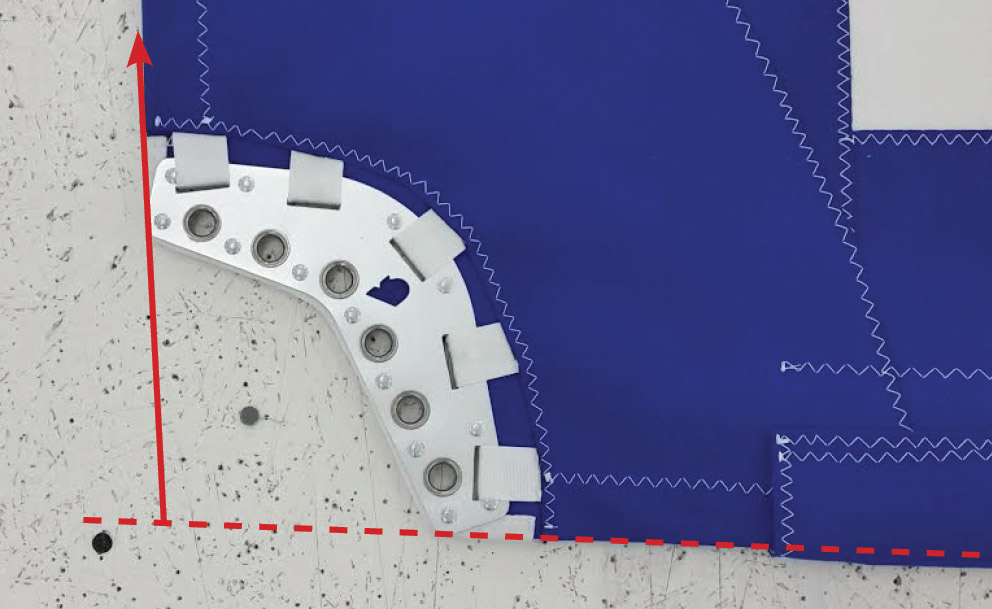
H1 - HEADBOARD WIDTH
H1 is the width at the top of the mast where the main sail should go to the top.
H1 can be measured by the following methods:
Headboard width
The width of the headboard is measured as shown in Example 1 below.
Most people choose to take this measure as it can be taken on the sail.
Max measure on rig
You can choose to measure the maximum distance from the mast edge to the rear - where the sail should stop at the top. In this way we choose a headboard that fits best in relation to the size of the roach.
If you measure H2 at the same time, we make a roach that does not hit the rear stay.
Example 1 - Headboard width
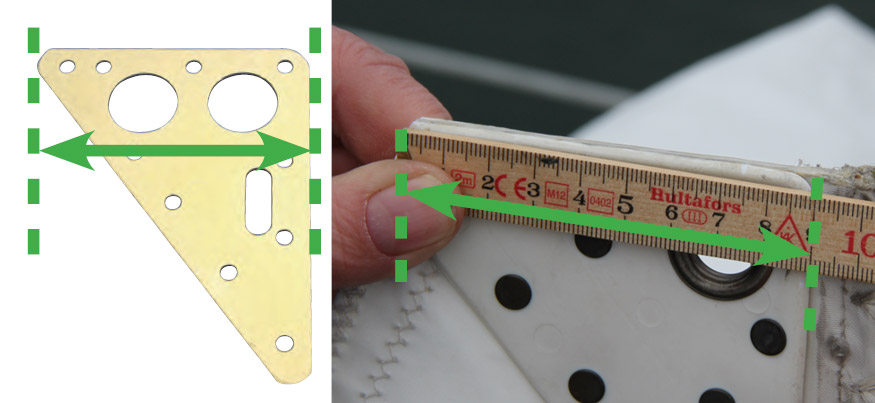
You measure the metal or plastic part itself along the top edge. This is "Headboard width". Most people choose to take this measure as it can be taken on the sail.
Example 2 - Max measure on rig
You measure the distance from the mast to the rear stay where the sail should stop at the top.
H2 - MAST TO REAR STAY
H2 is the distance from the edge of the mast to the rear stay along the boom. Together with H1, H2 defines how large a roach we can put on the sail.
H2 is measured from the rear of the mast at the boom, along the boom and in a continuous line out to the rear stay.
SLIDES - CARS
Sleds (and wagons) are the ones that goes into the mast along the luff of the mainsail.
Slides
The most common types are the top two groups below "Round bottom slides" and "Flat bottom slides".
Some masts are for ropes only. However, these masts may still use some special slides, which you will find under "Slides to replace rope".
The most common slides are marked with green, and you will most likely need one of these types.
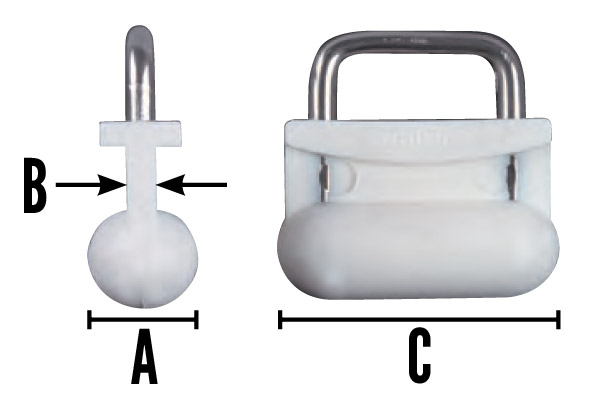
Round bottom slides
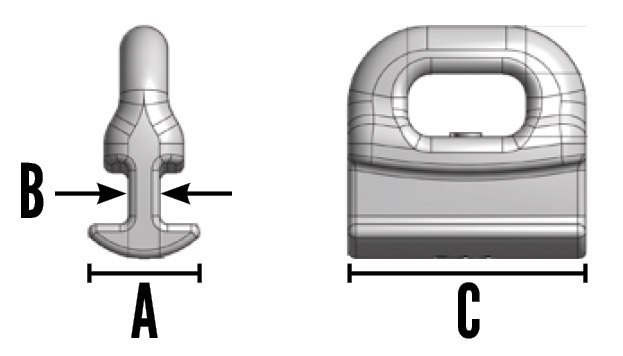
| Type | A | B | C |
| A013, 1334, HA558 | 11 mm | 3 mm | 25 mm |
| A014, 1335, HA458 | 14 mm | 4 mm | 30 mm |
| A015, 1336 | 14.5 mm | 4 mm | 40 mm |
Flat bottom slides

| Type | A | B | C |
| A007, HA89 | 15.5 mm | 6.5 mm | 30 mm |
| A008, HA90 | 18 mm | 9 mm | 30 mm |
| A009, HA91 | 22 mm | 11 mm | 35 mm |
Slides to replace rope
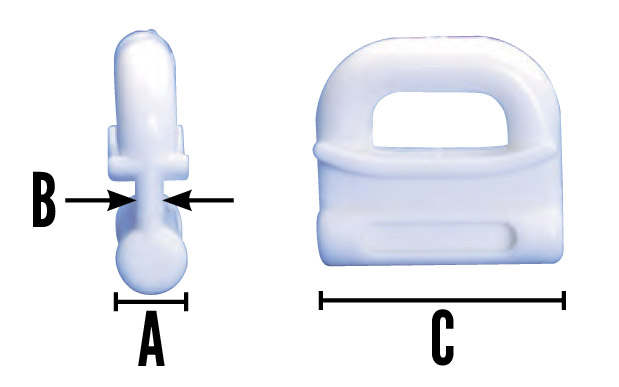
| Type | A | B | C |
| A016 | 7.5 mm | 3 mm | 27 mm |
| A017, HA158 | 9 mm | 3 mm | 27 mm |
| A018, HA358 | 12 mm | 3 mm | 27 mm |
| A019, HA258 | 14 mm | 3 mm | 25 mm |
Slides to replace rope
| Type | A | B | C |
| A016-S | 6.9 mm | 2.5 mm | 27 mm |
| A017-S | 8 mm | 2.5 mm | 27 mm |
| A018-S | 11 mm | 3.4 mm | 30 mm |
| A019-S | 10 mm | 3.4 mm | 30 mm |
Slides for rails
| Type | A |
| B014SS | 15 mm |
| B015SS | 22 mm |
| B016SS | 25 mm |
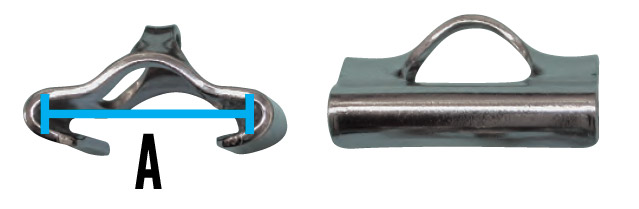
CARS
To find the right car it is a good starting point to find the right slide above first. Then find the most likely car by finding the slide type in the "Matching slide" below.
Cars
| Type | Wheel Ø | |
| Rutgerson 1525-11 Matching slide: A013, 1334, HA558 A014, 1335, HA458 | 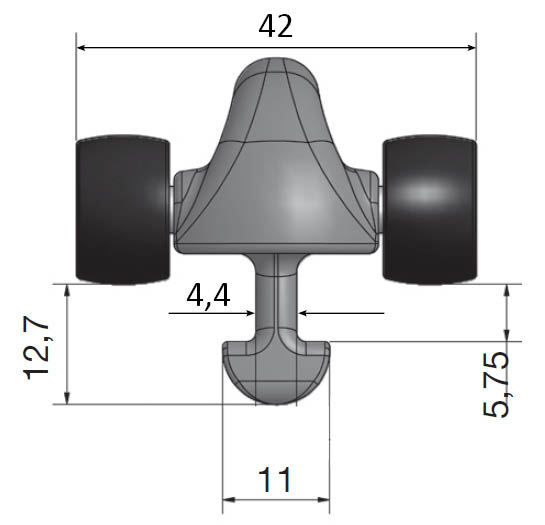 | 15.20 mm |
| Rutgerson 1525-16 Matching slide: A007, HA89 | 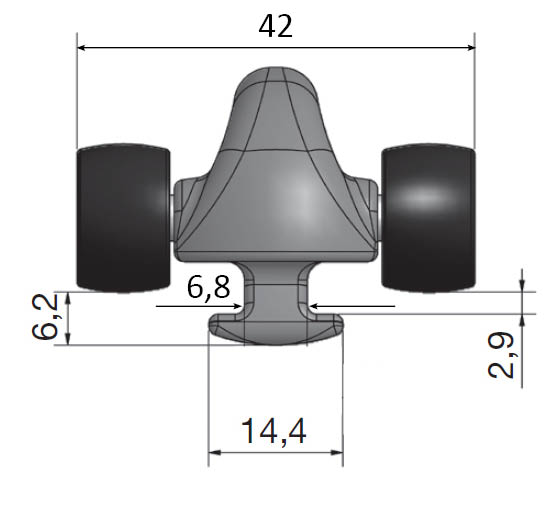 | 15.20 mm |
| Rutgerson 1525-19 Matching slide: A008, HA90 |  | 15.20 mm |
| Rutgerson 1525-20 | 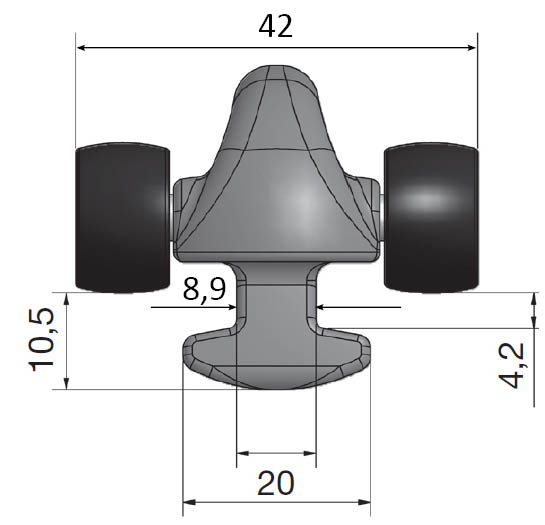 | 15.20 mm |
| Rutgerson 1525-23 Matching slide: A009, HA91 | 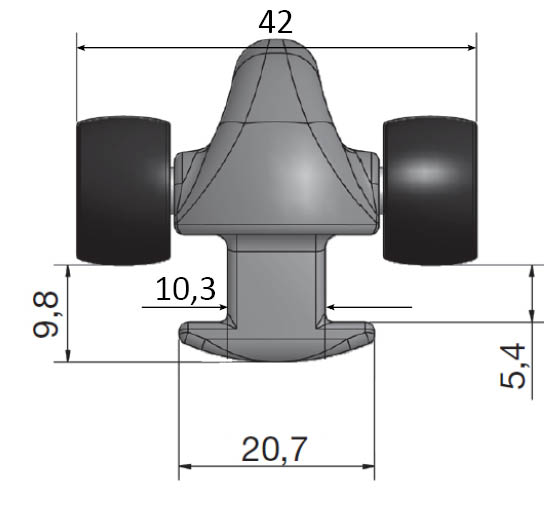 | 15.20 mm |
| Rutgerson 1526-11 | 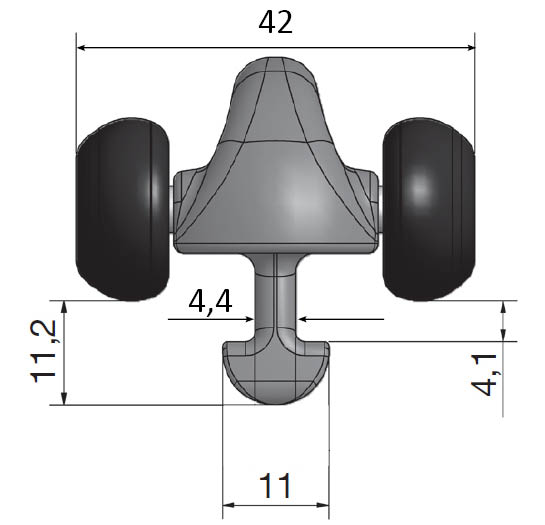 | 19.50 mm |
| Rutgerson 1526-16 | 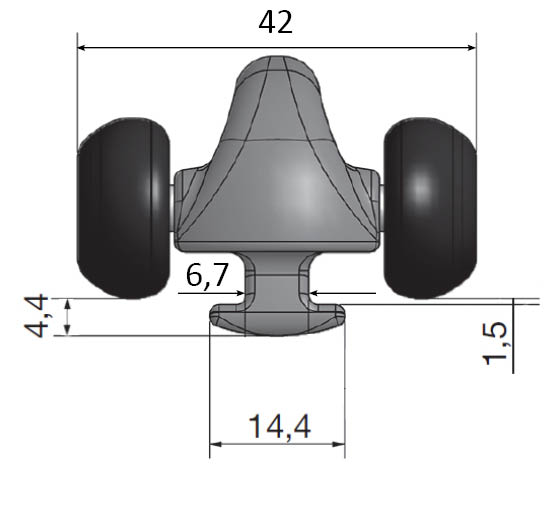 | 19.50 mm |
Diameter on slide/rope on foot
This measure determines in what diameter we make the slide we put at the end of the sail down to the boom. If you have ordered rope to the bottom of the sail, we will use this diameter too. Usually we use 7-10 mm rope or slide.
HEADSAIL
Introduction to headsail
It may seem logical to measure the old sail. However, in practice it is easier and far more accurate to measure directly on the rig.
V - LUFF
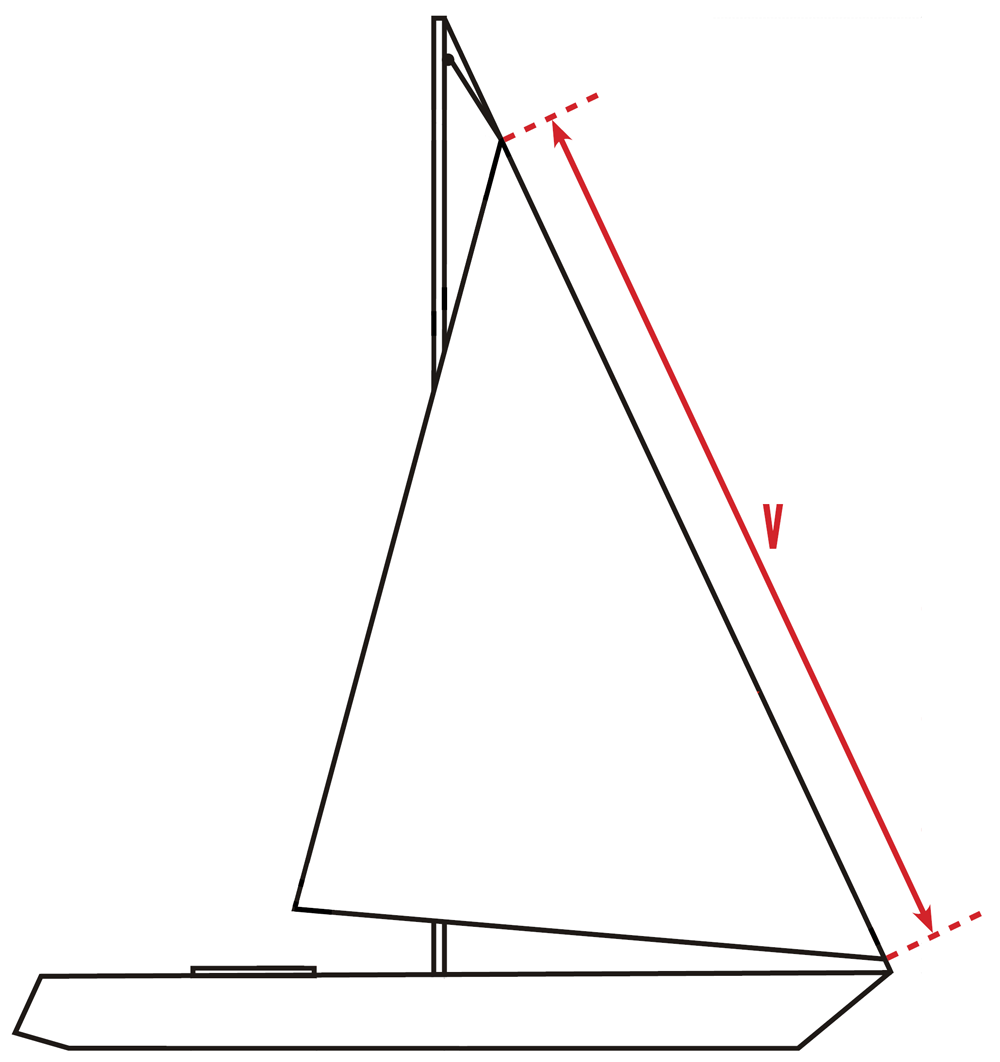
The settlement is the front of the sail up towards the forestay.
V - Measured on furled genoa
This section is only for genoa/jib on rolling/furler system.
The sail has to be stretched out well.
We make roll genoa with a strap at the top and bottom of the luff. This is where you attach the sail to the drum at the bottom, and to the swirl at the top of the roll system. The straps fill a total of 5-6 cm, and lie beyond the sail edge at the top and bottom.
We must have dimensions from sail edge to sail edge if there are already straps or metal ring outside the sail edge. If there are eyes inside the sail, measure from the inside of the eyes. Some sails have an eye inside the sail at the bottom and strap on the outside at the top. In these cases, a combination of the measurement methods below is used.
Curves should not be measured
Do not measure curves. You need to measure in a straight line between the shortest points.
Strap/webbing at the top or bottom
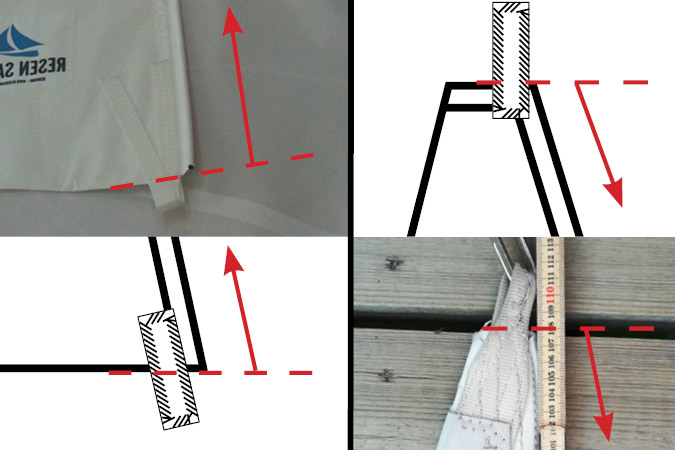
If your roll genoa has a strap/webbing in either top or bottom, measure from sail edge. Without the strap.
Eyes inside the sail in top or bottom
If your roll genoa has an eye inside the sail in either top or bottom, measure from the inside of the eye. It will become the edge of the new sail. In addition, we will put a strap of 2.5 to 3 cm. Thereby the strap is at the same point as the outer edge of the eye of the old sail, where the shackle of the drum or swirl is sitting.
Ring at the top or bottom
In rare cases, a ring has been sewn outside on the sail in either top or bottom. In these cases, measure from the edge of the sail.
V - Luff measured on non-furled genua/jib
This section is only for measuring genoa/jib with piston hanks/plastic hanks. Roll system sails need to be measured a little differently.
The sail is stretched out well. It is measured from sail edge to sail edge. If corners are rounded, the edges must be extended by eg. a batten
Do not measure curves. You need to measure in a straight line between the shortest points.
Luff on non-furled genoa/jib

Luff is measured from sail edge to sail edge. If corners are rounded, extend edges with a batten and measure to where they meet.
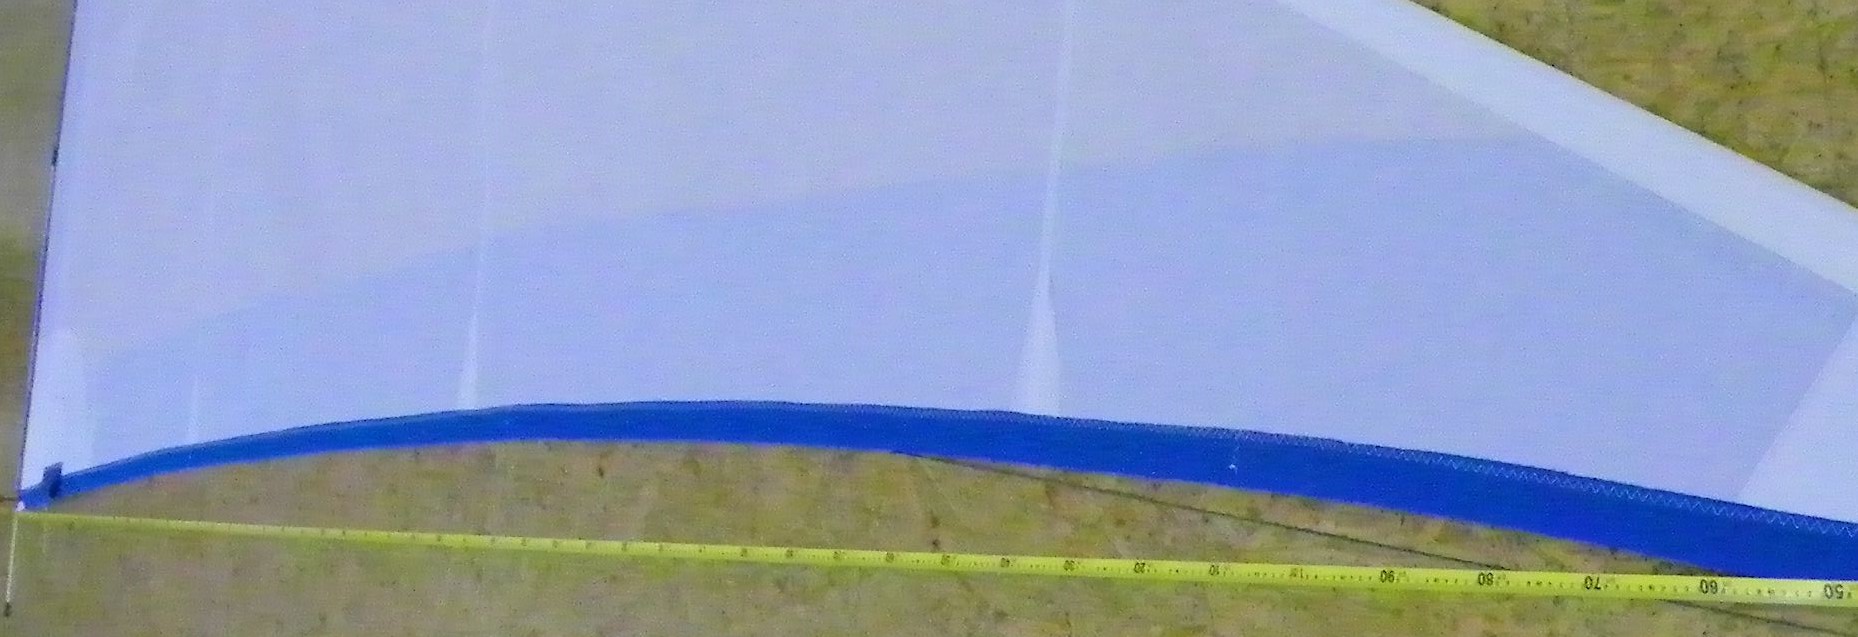
U - FOOT
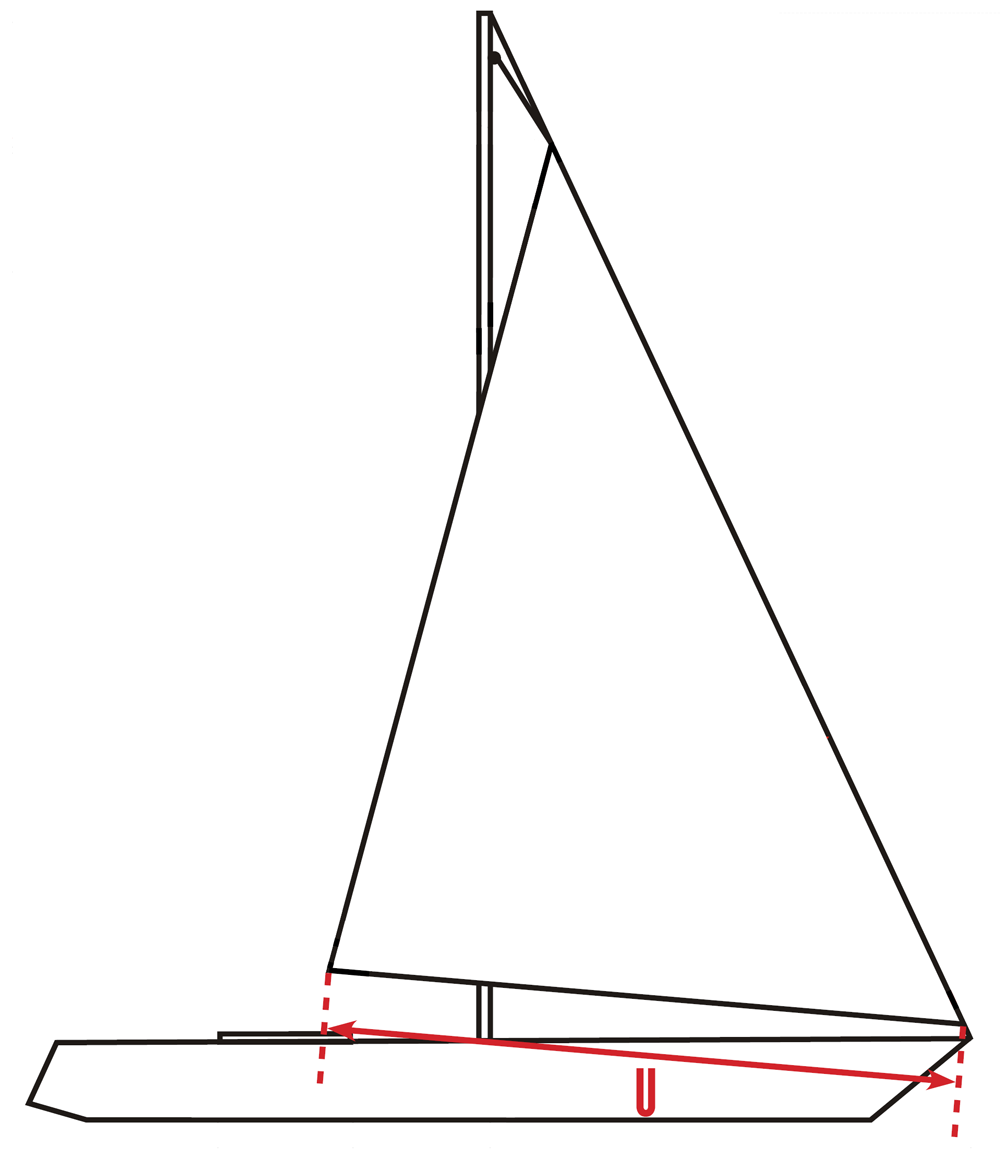
The foot is the lower edge of the sail.
Foot extension of edges 1
Luff is measured from sail edge to sail edge. If corners are rounded, extend edges with a batten and measure to where they meet.
Self tacking
Self tacking sails are measured by extending leech and foot. Measure where the two lines meet.
A - LEECH
The leech is the rear edge of the sail.
Curves should not be measured
Do not measure curves. You need to measure in a straight line between the shortest points.
Leech
The leech is measured from top of the sail from the leech across the sail down to the clew. Extend the edges so you measure "past" the rounded corner.
Self tacking
Self tacking sails are measured by extending leech and foot. Measure where the two lines meet.
Y - MAX LUFF
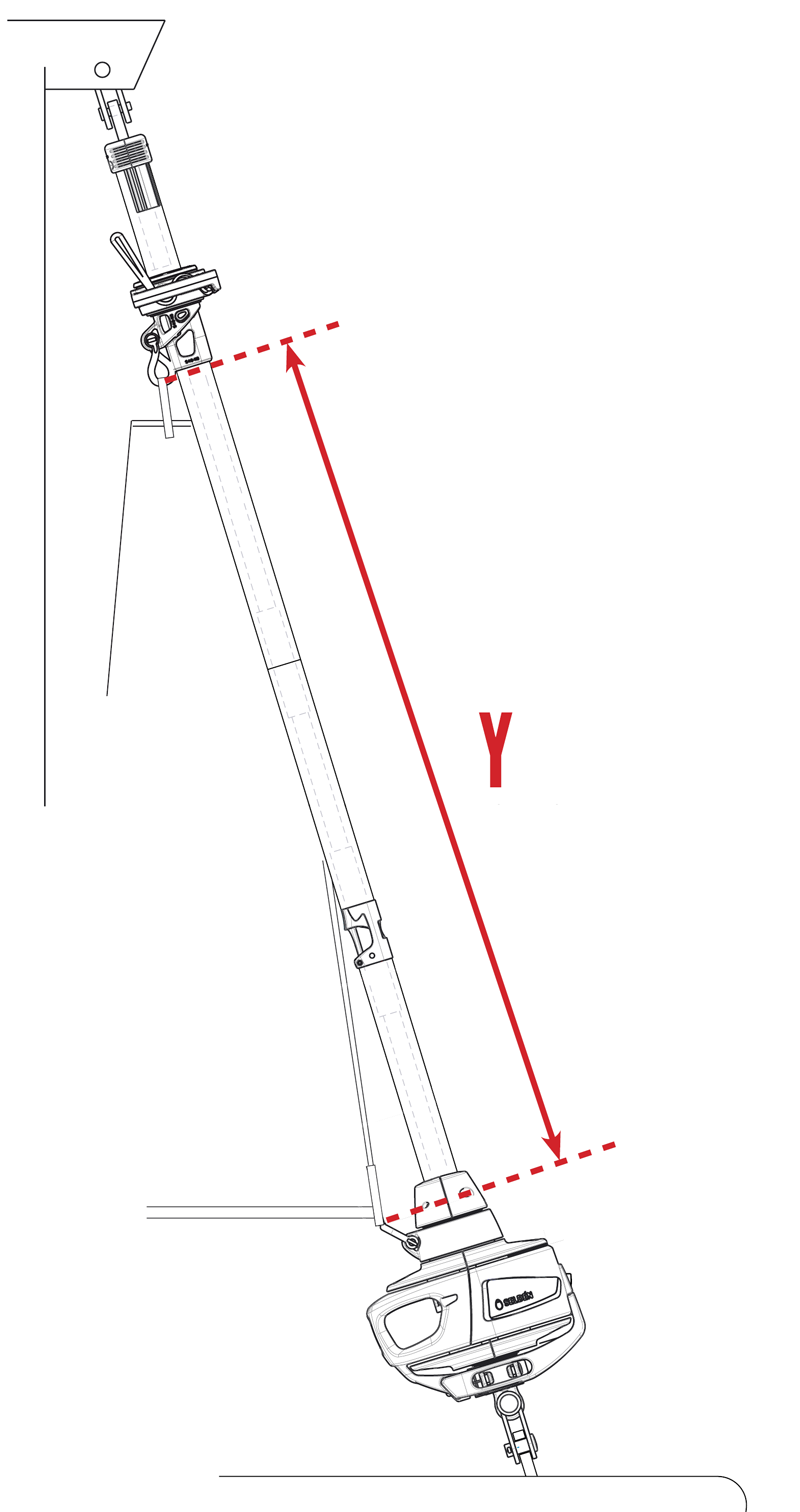
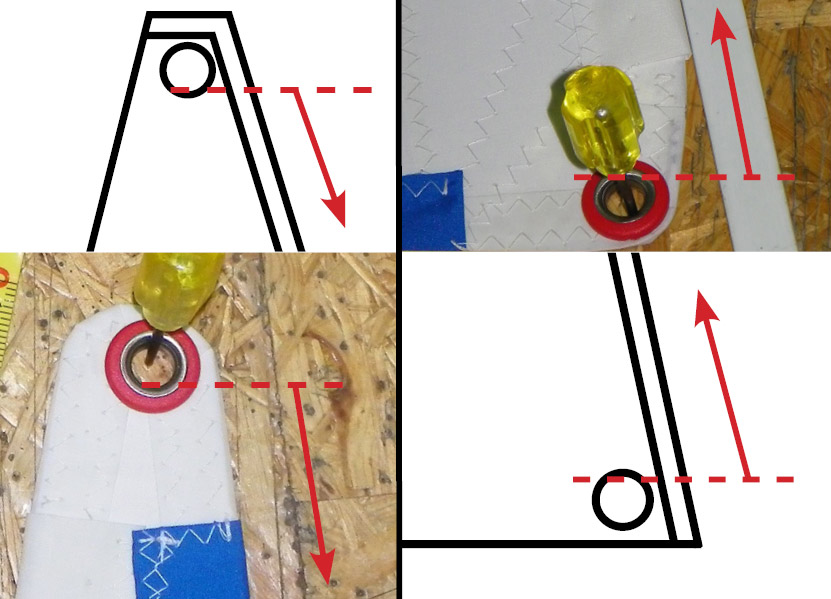
To determine the Y-measure, which ensures the correct length of the foresail's luff, follow these steps:
Attach a measuring tape to the shackle on the underside of the swivel that raises the sail. Pull the swivel all the way up to the desired level.
Measure the length from the underside of the swivel down to the shackle on the top side of the drum at the bottom. Ensure that you measure only this stretch, and that your current sail is not pulled up in the process.
If you have a headsail without a roller system, instead, pull the measuring tape all the way up into the halyard and measure the length down to where the headsail is attached at the bow by the deck.
If your furler system is below deck, in an anchor well, you should not measure from the shackle on the drum, but from where the roller system/forestay intersects the deck.
X - SAIL LIFT FROM DECK
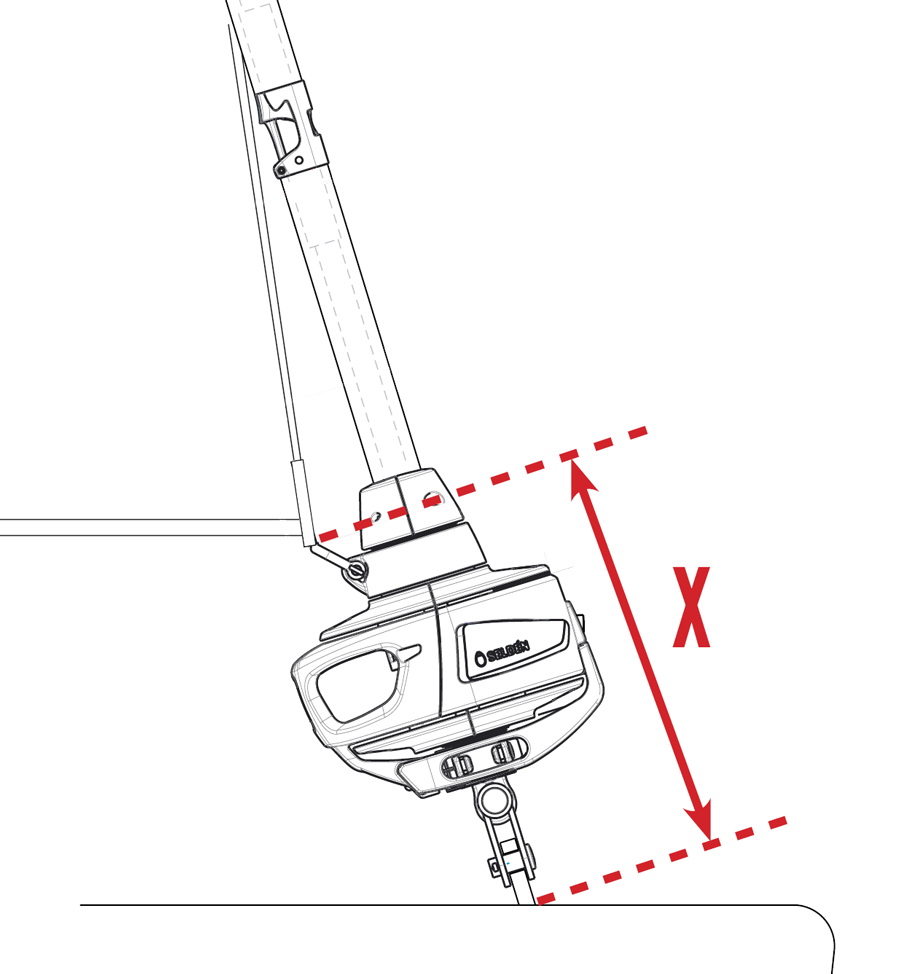
We use the X-measure when designing the sail, to find out how high the sail will sit above deck. Measure from the split holding the forestay at the deck and up along the forestay past the drum to the top of the shackle just above the drum.
Z - TOTAL LENGTH OF FORESTAY
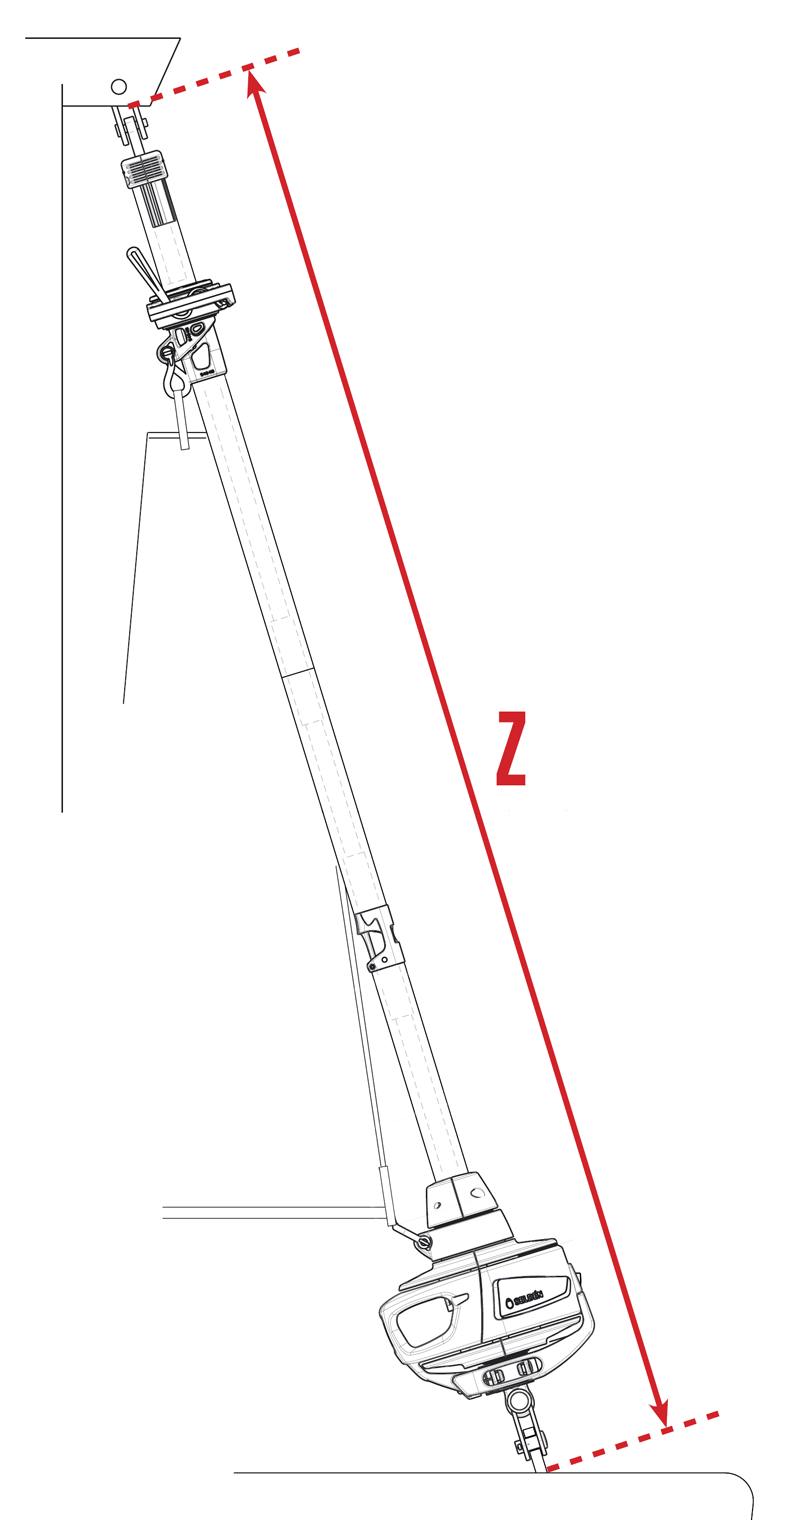
The Z-measurement is used to determine the correct dimensions and proportions for a headsail for your boat. To take this measurement, you need to measure the distance from the point where the forestay is attached to the deck, all the way up to the point where the forestay is secured to the mast. You can also measure this distance by pulling a measuring tape up either the spinnaker halyard or the genoa halyard and estimate how far it is from the end of the measuring tape to the rest of the way up to the mast.
The key is to measure the total distance from the deck at the bow (front of the boat) all the way up to the mast, taking into account any roller/furler systems, so the measurement bypasses the drum on bottom and swivel at the top of the mast.
If you have a furler system in an anchor well, you should measure from where the forestay intersects the deck, and not from the bottom of the anchor well itself.
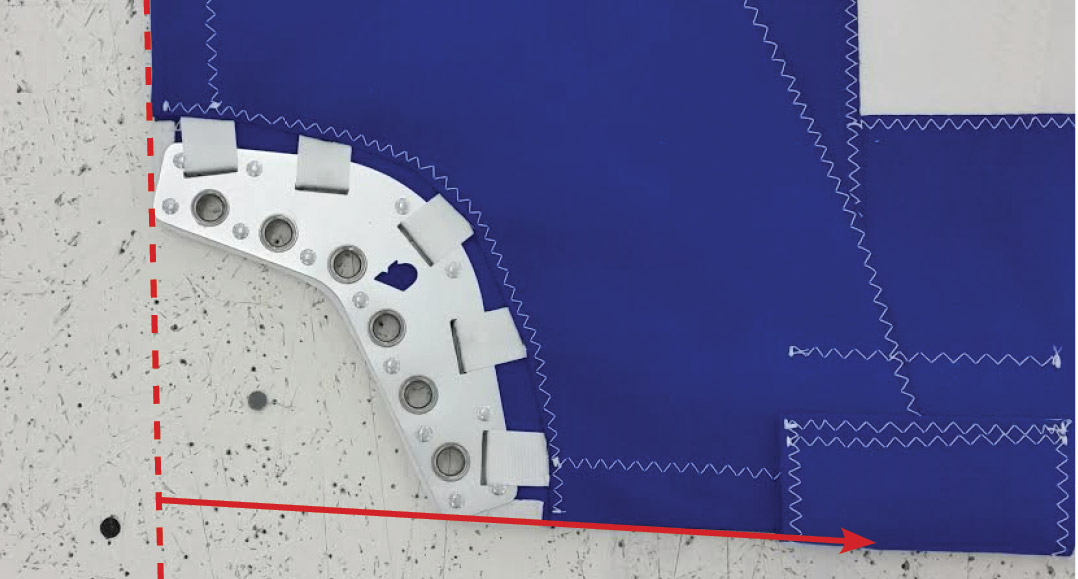
E/D - RAILS/PROFILES ON DECK
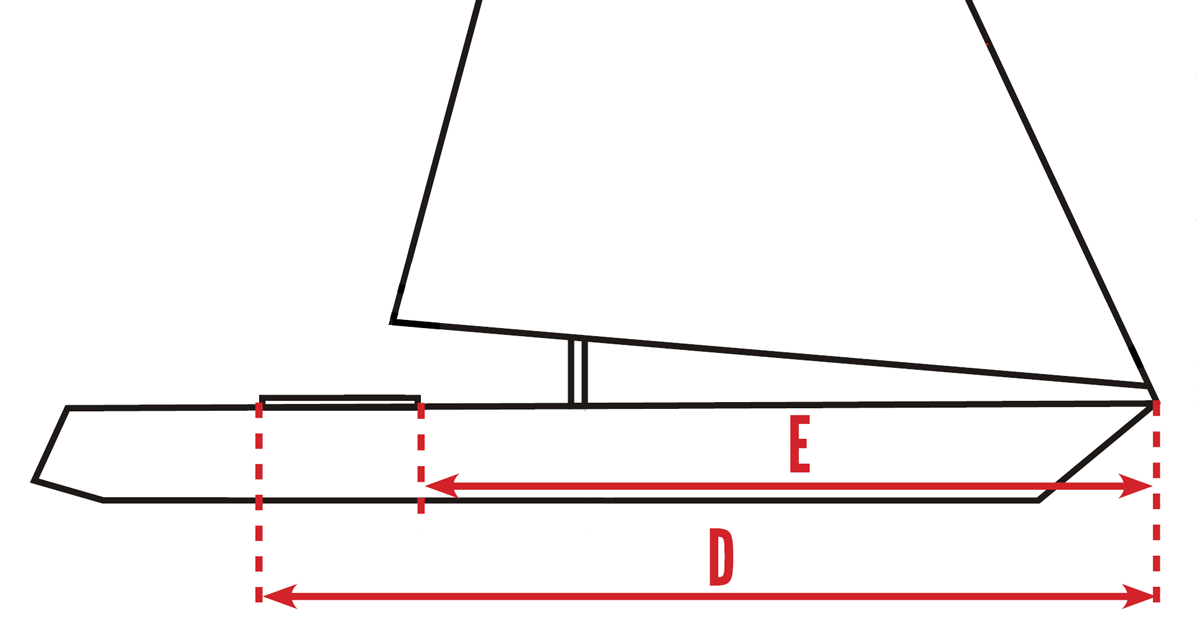
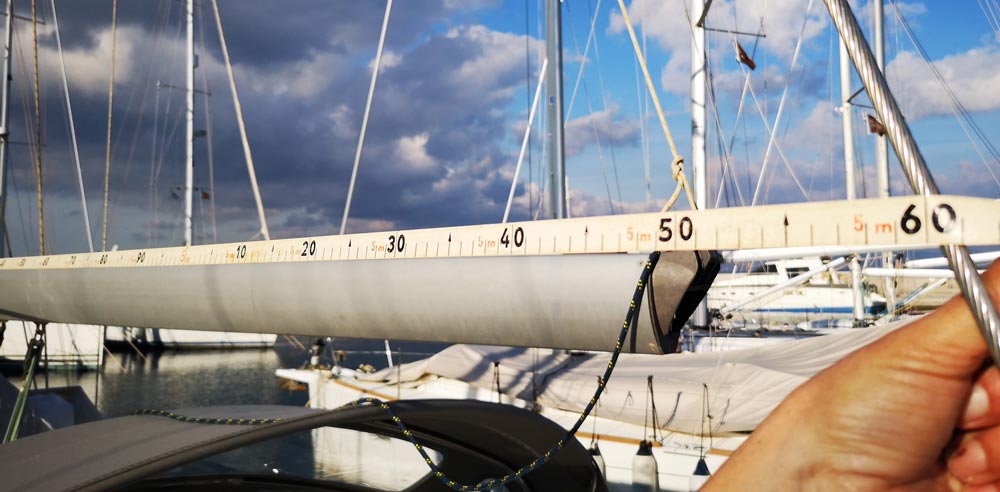
The E and D measures are used to find the proportions of the front sail, so that the sail can be optimally trimmed on the rails/profiles on deck.
Measurements are taken from bow where forestay are attached to deck, around stays on the side, and to respectively front edge (E) and rear edge (D) of the rails/profiles on deck.
Example
In this example, the D-measure (the trailing edge of the rail/profile) would be set to be approx. 6.65 m.
J FORESTAY TO MAST
The J measurement is the horizontal distance from the forestay's attachment point on the deck to the front of the mast. Measure from where the forestay is attached to the deck to the front edge of the mast.
If the forestay is located in an anchor well, measure from where the forestay intersects the deck.
If the forestay is attached to a bowsprit, measure from where the forestay is secured to the bowsprit.
M - SHACKLE ON DRUM
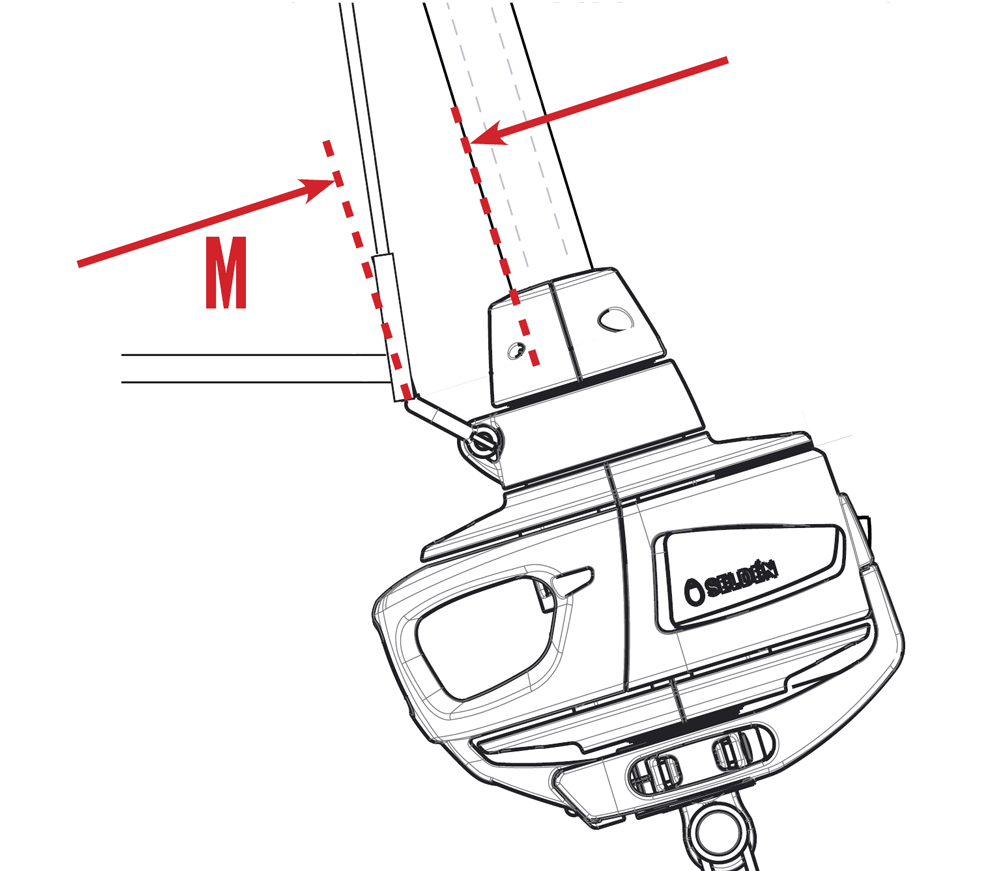
We use the M-measure to determine how to make the bottom part of the sail fit to the drum. The sail is cut slightly at the bottom because the shackle on the drum sits slightly out from the aluminum profile.
The measures is taken by putting the shackle in approx. 45 degrees. It is measured from the top of the shackle to the edge of the aluminum profile.
W - SAIL ENTRY OPENING
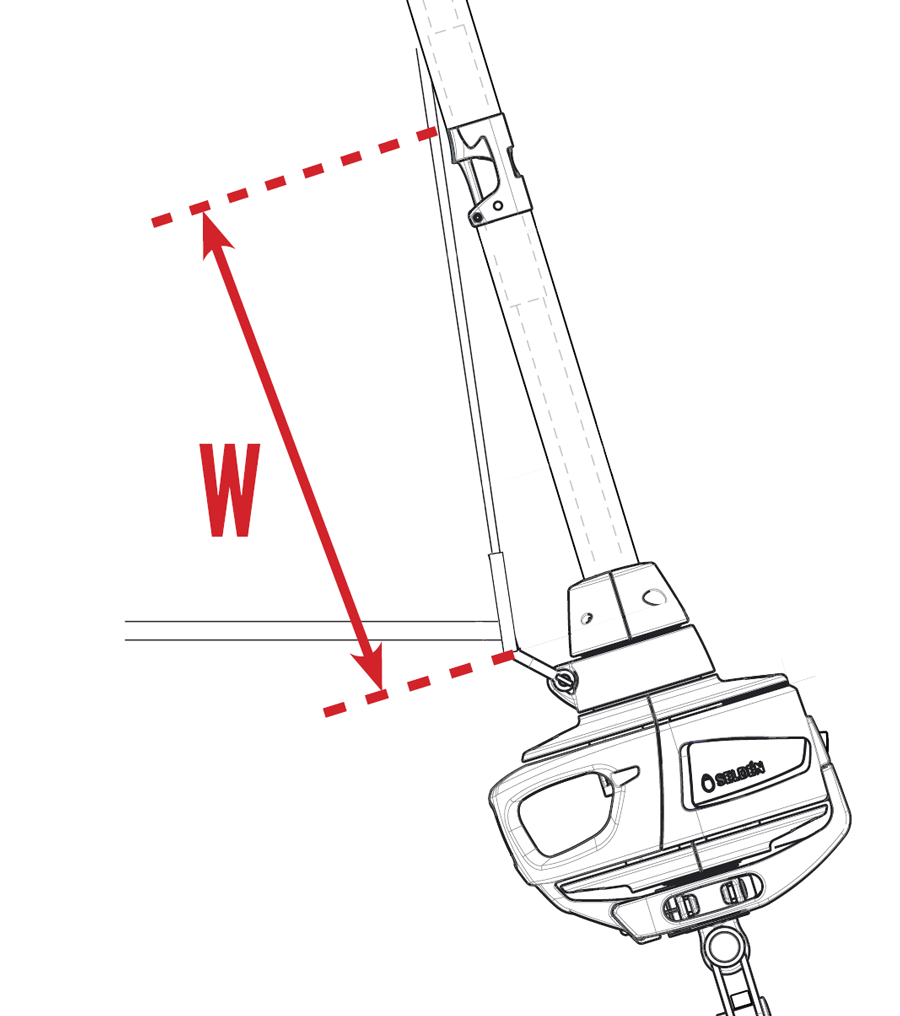
The W-measure is used to determine how high up the rope on luff to the aluminum profile should start, so it goes clear of the sail entrance. The measure is taken by measuring from the shackle up to the top of the place where the sail is inserted into the aluminum profile.
Luff rope size
We use this measure to determine the thickness of the rope in the aluminum profile on the rolling system. In our database we have the dimension of virtually all roll systems. So most often it will be enough to indicate which roll system is mounted on the boat. It requires that you have the make and model number of the roll system.
Most roll systems incl. Harken and Furlex use 5 mm.
Plastimo S models use 6.5 mm.
Plastimo T models use 5 mm.
Measured on sail
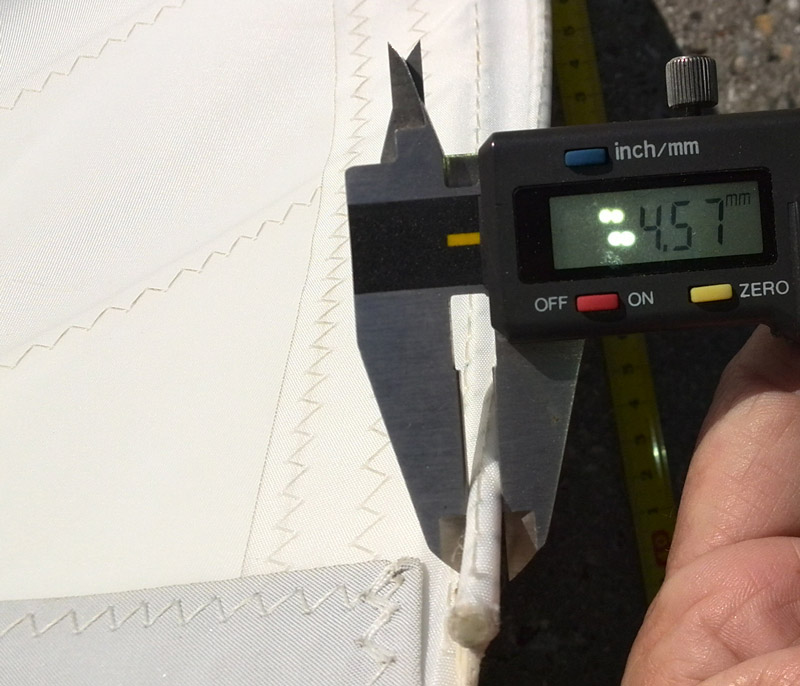
Measure the thickness of the rope on luff of the sail. You must measure the total thickness including sailcloth.
Measured in profile
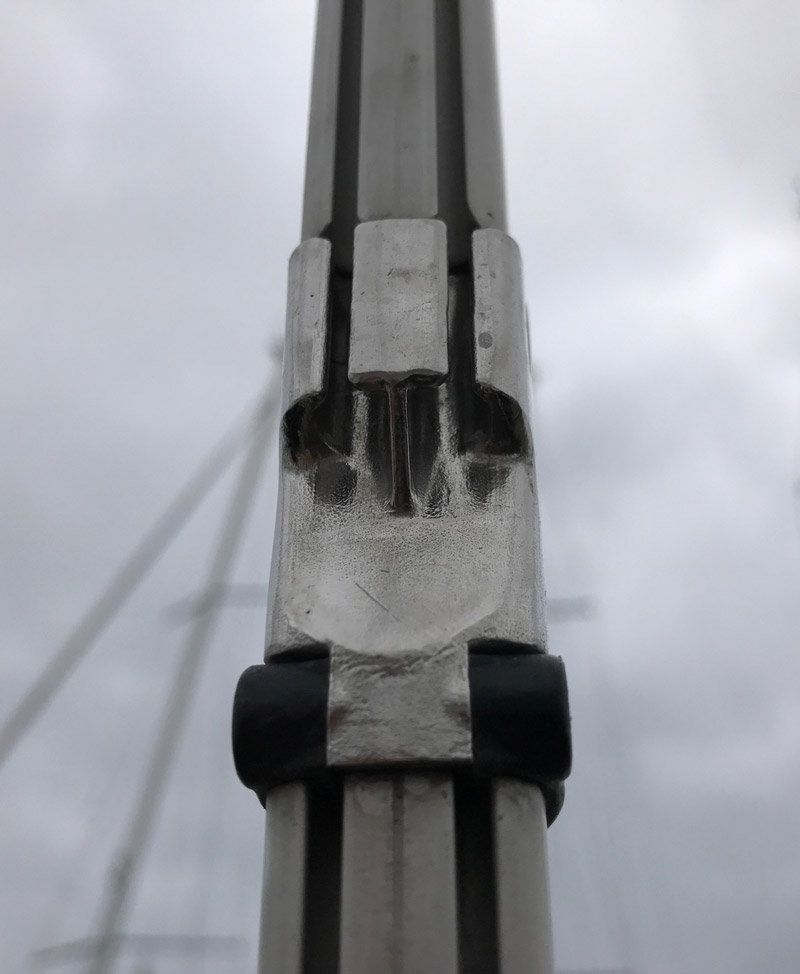
You can measure the thickness directly in the profile. Find a drill at e.g. 6 mm and see if it fits into the profile. Note that the thickness of the finished sail must be 1-2 mm smaller than the inner diameter of the profile.
UV - COLOR AND SIDE
If you have ordered UV cloth on the sail we will mount this on the edge of leech and foot. When the sail is rolled in, the UV cloth covers the entire sail. Depending on which way the sail is rolled in, the UV cloth must sit on either starboard or port side. The easiest way to determine which side the UV cloth should be on is to see which side of the boat the line to the drum sits on. The UV cloth should sit on the opposite side of the line.
If the line goes from the drum along the side of the boat to starboard, the UV cloth must be mounted on the port side - and vice versa.
UV - Colors
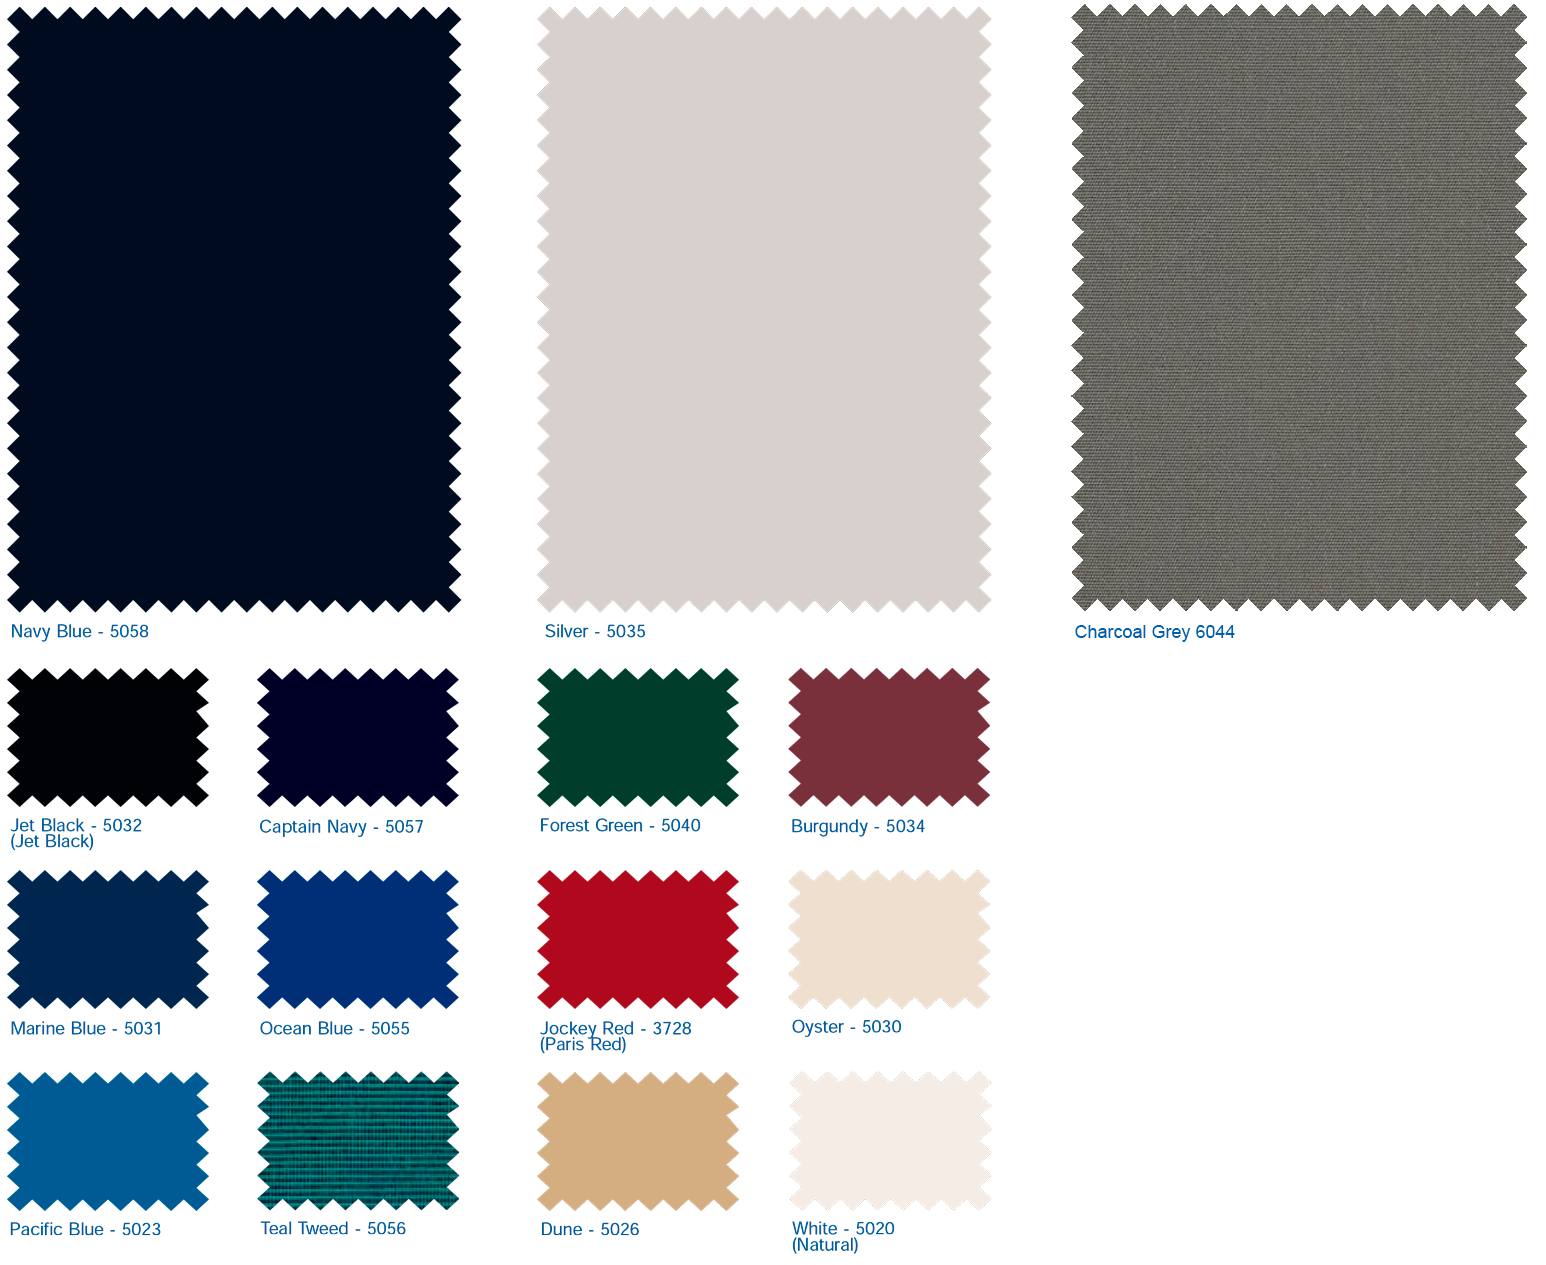
If you try to match the same color as e.g. your sprayhood, you should be aware that your sprayhood may be faded, being made in another type of fabric, and probably not going to match exactly.
Therefore, choosing a completely different color can be an advantage. We always recommend the Silver 5035, which is very popular. It is neutral and very sturdy.
LAZYBAG
Introduction to lazybag
It is quite simple to take measures to the lazybag. If we make your mainsail at the same time, we only need a few measures. If you already have a mainsail, we should have a few more measures.
Measures for lazybag
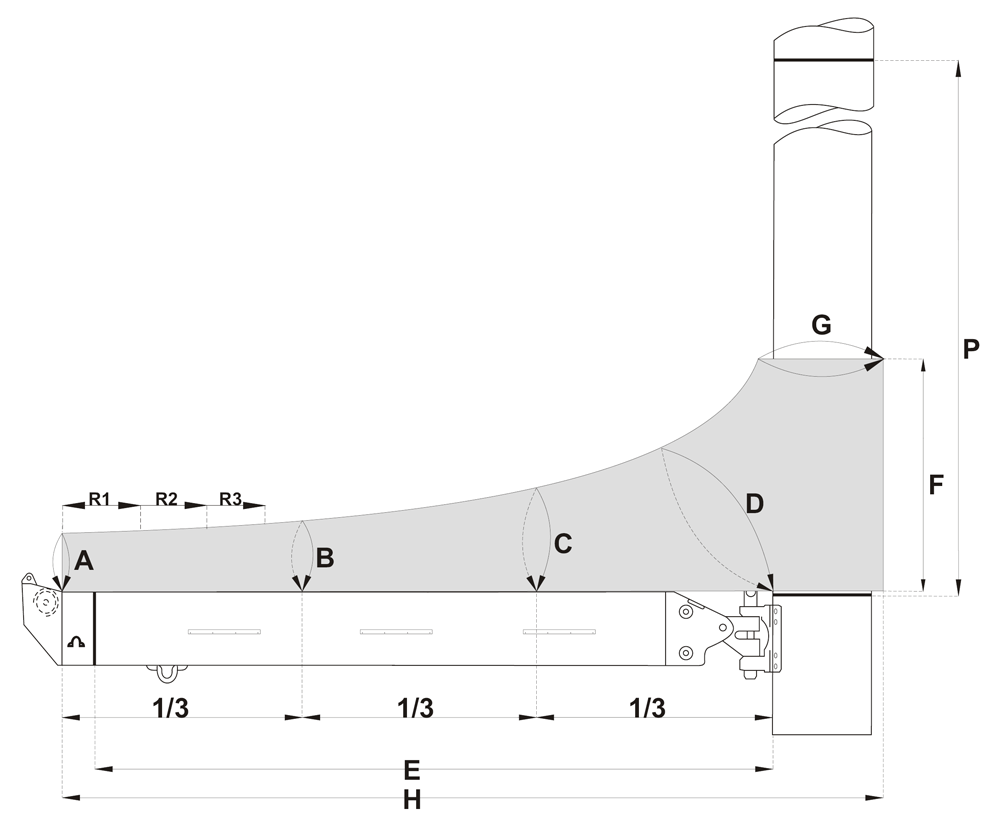
A, B, C,D
A, B, C and D determine the size of the lazybag perimeter around the sail. Generally, it is a good idea to make the lazybag a little tight, as to avoid it getting saggy on the top where rainwater can then accumulate. A slightly tight lazybag looks more harmonious.
You start by packing the sail with as many pieces of ropes as possible. Do not tighten the sail too much.
The measurement depends on whether you have rope at the bottom for profile in the boom or if you have profile rails on the side of the boom. We always recommend a mainsail without rope at the bottom of the boom (footless) as it has far more trimming options. At the same time it is nicer with a boom without profile rails.
Lazybag with 1 rope at bottom for profile in boom.
Here the circumference of the sail is measured.
Lazybag with 2 ropes at the bottom for profile rails mounted on the side of the boom.
Here it is measured from the profile rail on one side, up over the sail, and down to the profile rail on the opposite side.
We recommend that the lazy back ends 10-15 cm past the trailing edge of the main sail. Mark this spot on the boom. Measure from here and all the way to the mast. This goal is divided into 3. You now have how far from the mast between each target.
Measure A
Measure A is taken 10-15 cm from the end of the sail. If you have difficulty assessing the perimeter here, you can measure the perimeter at the end of the sail instead.
Measure B
Measured 1/3 from measure A.
Measure C
Measured 1/3 from measure B or from mast and out.
Measure D
Measured diagonally from where the boom's top and mast meet, and 45 degrees above the sail, and down the other side.
Note that some types of booms besides profile in the middle also have a profile on each side. These are designed for reefing system blocks and are flat at the bottom. Ropes cannot be driven down into these, and slides on each side of the lazybag give an ugly result.
H - Total length
Measure H is the total length of the lazybag from the front edge of the mast and 10-15 cm past the aft end of the mainsail. Or, put another way; from the front edge of the mast to measure A.
G - Perimeter mast
We use measure G to determine the size of the lazybag around the mast. The measure is taken as you would normally put the lazybug around the mast when leaving the boat. So including halyards etc. along the mast.
You can take the measure tight or loose. If you take the measure tight we add a little. If you make it loose, we will produce the perimeter of the lazybag in this length.
F - Height of lazybag on front
We use measure F to determine how high the lazybag should be on the front edge of the mast.
The measure is taken by measuring the height of the sail, from the top of the boom and right up to where the sail is when packed. In addition, you add approx. 25-35 cm so there is room for headboard and a little way down past the boom. It is best to decide for yourself how high you want the lazybag, and rather a little too high than a little too low.
Y - Lowest point of sail
Measure Y we use to determine the height of the lazybag up above the sail on the mast when we simultaneously produce your mainsail.
We know how many slides we mount on the mainsail, as well as the height of each slide. What we do not know is how far down the lower slide can get to the boom. On some boats there is an opening in the mast where the slides run in, and this opening can either have a slide stop so that the slides cannot come past this opening, or it can be closed so that the slides can run all the way down to the boom.
If the slides can go all the way down to the top of the boom, specify 15 cm in measure Y. Otherwise, note the distance from the top of the boom to the point where the bottom slide is at the slide stop.
Number of ropes on bottom
If you have profile rails on the side of the boom, enter "2 ropes at the bottom".
To use the profile in the boom for lazybag (recommended), enter "1 rope at the bottom".
E/P - Length of luff/foot
E and P are foot and luff lengths on the mainsail. We most likely have these measures in our database already and they don't need to be exact. We use the measures to assess whether the measures you have taken look correct, as well as if you have ordered lazyjacks ropes and blocks.
R1, R2, R3 - Holes for reeflines
We use measurements R1, R2 and R3 if you want us to make holes in the lazybag for your reef lines.
The measurements are taken from the trailing edge of the lazybag 10-15 cm past the edge of the trailing edge of the mainsail - at measure A.
Measure the position of your reef lines on the boom and indicate which side they sit on.
It is quite easy to make these holes when you receive the lazybag, and it usually gets better when you do it yourself, as the location of the lazybag may vary slightly.
Colors
If you try to match the same color as your sprayhood, be aware that your sprayhood may be faded. Therefore, finding the exact color can be difficult. Most often it looks nicer if you choose a neutral color instead - the Silver 5035 is very popular.